- Home
- /
- Company’s Blog
- /
- Blog
- /
- Gas Stove Repairs: The Most...
Gas Stove Repairs: The Most Common Breakdowns And Methods Of Their Elimination
Wouldn’t you agree that calling a technician for the slightest oven problem can be very inconvenient? Let alone, taking your time off work to meet him at your house; in many cases, waiting for your turn as well as paying repair and labor fees. Therefore, wouldn’t it be better to learn how to repair your gas stove all by yourself?
After reading this article, you will be able to fix your stove yourself as well as do some maintenance work, so that your kitchen helper works like new. We will tell you how to disassemble the gas stove, and identify the most frequent breakdowns. You will also find detailed instructions on how to repair some defects all by yourself. More information about it in this article …
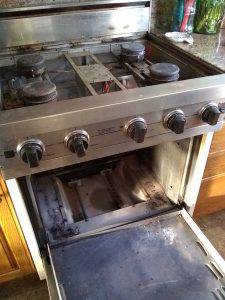
How to get to the internal equipment
Under the stove’s top you will have access to burner nozzles, gas control systems and electric ignition – and all of these features can be repaired without a technician.
- Remove the burners and put them aside in the same order they were placed on the stove (to avoid confusion upon assembly).
- Remove screws that hold the stove top in place. Most often there are two of them under the front burner, but on some models, they are placed on the front edge. There may also be 2 self-tapping screws under each burner.
- Gently lift the top so it doesn’t crack the enamel. If it still doesn’t, check if there are any self-tapping screws on the side surfaces.
- Create support under the raised top. If the top has been removed completely, place it horizontally so it wouldn’t damage the enamel or glass.
Note: It often happens that one of the bolts is stuck and does not give in. In this case cut the head of the self-tapping cutter with a hacksaw.
In order to access gas valves as well as repair knobs and control buttons, you might also need to remove the front panel. It is usually secured with two bolts at the bottom or sides, but on some models it is secured with latches. Take into consideration that the front panel is removed when the top cover is raised and the gas flags are removed. Read another topic…
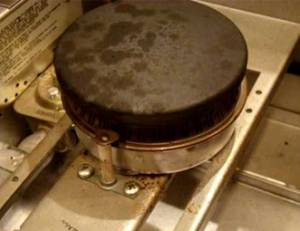
The pallet covers the oven burner. If you pull it out, you will get access to the burner, the gas control sensor and the piezo spark plug.
Electric ignition repairs
If you turn the knob, hear the characteristic hiss, but when pressing the button, the gas won’t light up – it means that there’s a problem with electric ignition of the gas stove, but the good news is that you could fix it yourself.
If you hear characteristic clicks, it means that the system is triggered, but there is no spark for the burner you are using. If there are no clicks, it means that either the button or block generator of electrical impulses is broken. Read another topic…
When the electric ignition of one burner is not working
When you can hear the characteristic clicks of electric ignition and one of the burners still lights up when using a match, which means that the problem is in the candle or wire from it.
Note: distinguishing the electric spark plug from the gas control sensor is easy: it is thick, in white ceramic insulation, located closer to the middle of the burner, in the notch of the splitter.
First of all, check the condition of the candle – it can be covered with a layer of dirt and grease
A layer of fat with dust on the candle can act as an insulation that a spark can’t penetrate. Try to wash the candle well by removing the burner and lastly degrease with alcohol or acetone. Soak it dry with a paper towel or toilet paper, let it dry completely, return the burner and check that it is working. Read another topic…
If cleaning does not help, you should look for the problem further. Lift up the stove table and inspect the wire that goes from the candle to the generating unit, try pressing the auto-ignition button. Perhaps the wire touches the foil on the oven heater or the pipe and a spark breaks through it? You can see it better in the dark or dusk – close the window, turn off the light. More information about it in this article tips…
If there is a spark somewhere other than a candle, wrap this place with tape and move the wire so that the spark would be only on the candle at the burner.
If this doesn’t work, take a good look at the candle all the way up: maybe it has cracked the ceramic insulation, which makes the spark slip lower than it should? If so, you’ll need to replace this part. Before you do this, be sure to unplug the stove from the socket. More information about it in this article tips…
In order to remove the candle, first remove the rubber gasket from the candle, squeeze and pull out the clamp underneath the candle, and then find and remove the appropriate wire from the generator block. After purchasing a new part, repeat the steps in reverse order.
Electric ignition does not click
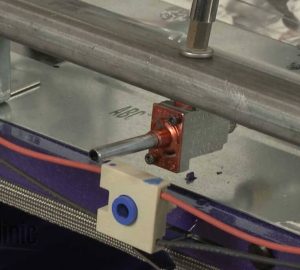
If the button does not light up any burner and/or you can’t hear any distinctive clicks or even worse – when the button is not working, the underlying problem is not with the candles. It might be necessary to check the functionality of the unit.
To check the functionality of the unit, do the following:
- Disconnect the stove from the socket, lift the table and find the block to which the candlestick wiring and the auto-ignition button are directed.
- Take all wires out of its connectors, remove them from the mount (bolts or latches).
- Insert a long piece of cable into the two thick connectors on the edge, and into the other sockets, pieces of wire of the same length, stripped from insulation on both sides.
- Position the loose ends of the short wires in a row or square, at equal distances from each other.
- Plug the long end of the wire into a socket.
After completing these steps, you should hear sparks between the loose ends and rhythmic discharge. If this is the case, that means the unit is working and the problem is with the button or wiring. However, if you won’t hear sparks, you might have to shop for the new unit. Read another topic…
Do not to confuse the other two power wires. Usually the plug is thicker on them, and the connectors for them are at the edge of the unit. You can change the wires from the burners. If the unit is operational, there is a problem with the button or wiring. Read another topic…
Note: Firstly, wash the button well – often it gets sticky and stops working due to fat accumulation under the skirt. It’s convenient to use a grease spray or remove the button from the panel.
Gas control malfunctions
This breakage often leads to the owner’s confusion: when turning and pressing the knob the burner or oven ignites as usual, but as soon as the knob is released the light goes out. In the case when you turn but don’t press the knob, or when the burner goes out – the gas control system automatically shuts off the gas as a childproof feature. Read another topic…
Usually it is enough to keep the knob pressed for 3 – 5 seconds, though the manufacturer recommends to press it for 10 – 60 seconds for reassurance. If the burner knob goes out even after one minute, it means that the leak protection system is faulty.
The gas control must only be installed in the oven or on all burners. The head of the thermocouple is located near the burner, it is metallic and rather thin, warming up quickly from the burning gas. This heat is transferred via a copper tube to the gas sensor, installed in the tap behind the burner handle. As soon as the heat stops flowing, the magnetic valve of the sensor opens to cut off the gas supply. More information about it in this article here …
Sometimes the gas control sensor might not work on the new stove. The reason is simple: the thermocouple nut is loosely tightened at the factory to the sensor in the burner gas supply valve.
Just in case, check and tighten the thermocouple attachment nuts from all burners so that you do not disassemble the stove again. Just open the stove table, find where the copper tube is attached to the tap (behind the burner knob) and tighten this nut to the stop.
Over time, soot and scale may form on the thermocouple sensor located near the burner. As a result, it heats up more slowly and works incorrectly. Fixing the problem is easy – clean the sensor with a thick cloth or sandpaper nulls. A coarser material is not recommended: if there are any scratches on the candle, it will clog faster next time.
The reason why the oven in the gas stove goes out immediately is usually also due to a problem with the thermocouple, but there might be another problem in the oven.
The oven burner is large and the sensor is located at the very edge of the oven – at the first gas nozzles. The flame may not reach the sensor or it may warm up too little. Try bending the sensor with a screwdriver, or unscrewing the mounting screw and pushing the thermocouple slightly forward. Read another topic…
When none of the 3 suggested solutions help, the thermocouple must be replaced. It is mounted with a nut on one side and a bolt clamp on the other. After removing the defective part, be sure to take it with you to the shop – for a sample.
Usually a thermocouple is inexpensive, but if you are willing to give up gas control on this burner, there is a free solution: Connect directly, bypassing the sensor. Read another topic…
To connect directly, do the following:
- cut off the gas;
- unscrew the thermocouple – copper tube from the gas valve with the sensor;
- unscrew the sensor housing on the back of the valve;
- the sensor looks like a plug with a stem on the spring. Secure it and put it back in place;
- screw the sensor housing back in place, tighten it. Screw in the thermocouple;
- open the gas on the riser pipe, check for leaks with soap foam.
Failure to assemble the valve could result in gas leaks and explosions – be careful and be sure to check the valve for leaks after assembly.
Burners’ weak flame
It might happen that no matter how far you turn the knob, the burner only burns at minimum power. If you don’t take any measures, it may stop burning completely over time. It’s most likely because the gas injector is clogged.
Escaped food rarely enters the nozzle, because it is protected by the upper part of the burner during cooking. Cleaning agents, especially soda-based ones, are a frequent cause of clogging.
Cleaning the jet is quite easy: First, you need to remove the top of the burner and raise the table; in some cases, you may need to replace the jet on the stove. The burner nozzle is a small part, the tip of the gas pipe, with a thin cavity in the middle. More information about it in this article here …
This cavity needs to be cleaned carefully. It’s best done with a toothpick. It is not recommended that you use metal objects to clean the cavity, so that you do not damage it.
In order for the dirt that has been cleaned not to escape outside and not get into the gas pipe, we recommend that you open the gas supply to this burner periodically – literally for half a second, but at full power. For safety reasons, open the window or switch on the hood. More information about it in this article here …
Problems with the burner handles
The gas supply knobs on the burner are one of the most necessary parts, it is impossible to use the stove without them. There is a gas tap behind the outer flag with the skirt that you turn, with a gas control sensor that is built in inside. More information about it in this article here …
In some stoves, electric ignition, which is usually built into the handle, can be found as a separate button.
Over time, the handles may stop turning, start to jam or scroll. Let’s analyze what we can do about it.
When the handle isn’t pressed or rotated properly
Such a problem is not uncommon. The reason behind it usually the grease that’s accumulated between the flag, the skirt and the front panel of the stove.
When it’s heated, the grease splashes during cooking and easily drips into all the gaps, and after cooling down, it thickens and turns into a glue.
To get rid of the problem, wash the grease off. The handle needs to be pulled on itself – it is just tightly fitted on the rod, without latches or other locks. For convenience, you can grab it with pliers, preferably through a non-slip rag, sold specifically for cleaning.
The skirt usually flies off itself after removing the handle, and if it doesn’t give in, it can be tucked in with a knife. Remember its position so that the latches to the panel will close during assembly.
Many models have a metal reinforcement plate in the handle, so don’t lose it. After you have washed all the parts as well as the front panel under the handle, reassemble everything in place. Remember to insert the spring if you have one.
When the handle scrolls or falls off
This problem occurs when a metal plate that clings to a notch on a rod has fallen out of a flag and is lost.
You can cut out such a plate from a metal cap for preservation and insert it into a special groove, or buy a new one. If your model handle is completely plastic and its inner part is licked, only buying a new one will help.
When the handle is too tight to rotate
It could happen that even after proper cleaning, the handle still turns tight. The reason is that the grease on the gas faucets has been depleted.
If you have decided to lubricate gas faucets yourself, buy a special graphite grease for this. Cut off the gas supply to the stove. Then remove the handles and the front panel – we have described above how to do this.
Usually the rod is flanged to the tap, therefore to remove it by simply unscrew the 2 bolts at the sides. Wash the rod immediately from grease and dust.
The spring is then removed and the valve plug needs to be lubricated. This is a cylindrical part with a through-cavity, through which gas is fed to the burner. Lubricate the plug just a little, the layer should be invisible, but felt when touching it. It is more convenient to put some grease on your finger and rub it on.
How to fix your stove’s timer
Please note, that you can only remove and repair the mechanical timer, the electronic timer should be taken care of by a specialist. The mechanism of the alarm clock looks like a big metal tablet.
To get it out, take off the handle, lift the stove table and unscrew the fasteners. Then open the timer case, blow off and brush off the dust, lubricate the pendulum and gears. More information about it in this article …
Try turning the knob by starting the timer. Did it start ticking? If so, you can assemble it and set it in place. If it’s not? Try taking it to a watch repair shop, or you can buy a new one.
Oven door
The most common complaint to the oven door is that it does not close properly. A well-adjusted door should close so that a piece of paper is held in place.
Otherwise, the slot is too big, which means that the heat loss will be higher, the food will be cooked unevenly and the top panel and the plastic handle will turn yellow. Such problems can be prevented by repairing and adjusting the oven door of the gas stove in time. More information about it in this article …
The manufacturer uses 2 types of hinges to attach the oven door – on the latch – collapsible, or solid, screwed on.
The first ones are easy to remove: just lift both latches, cover the door and pull up and a little on yourself. The door can then be conveniently washed or immediately returned to the correct position. After inserting the door into the grooves, pull it slightly upwards and then fully open and lower the latches.
To adjust the door on solid hinges, the screws of their attachment to the door must be loosened, but not unscrewed completely. Then loosen the door so that the hinges are in place and tighten the screws.
In addition, over time it may be necessary to replace the rubber seal – from the temperature it will dry out and crack. It is attached to the hooks, kept under tension, so the only problem that may arise is finding a suitable new seal in stores.
In addition to repairing the door, it may be necessary to remove the glass to wash it from the inside or replace the broken glass. The outer glass at the bottom is inserted into the metal guide rail and the door handle is pressed against the top. To remove it, simply unscrew the 2 or 3 screws holding the handle on the oven door – just hold the glass so that it does not break. Remember to wash and dry the handle itself, otherwise the drains from the handle will stain the glass while it is being assembled.
The inner glass is mounted differently depending on the size. The small ones at the top and bottom are clamped with bolts with large washers. To remove the inner glass, which occupies almost the entire door, unscrew the fixture on the lower end of the door.
Conclusions
Now you know more about your stove and its repair, and you will no longer call a tech because of every little thing. However, we would like to remind you that any repair related to disassembly of the gas pipe – lubrication of faucets, replacement of burners or injectors, replacement of the gas control sensor in the faucet – is better to be entrusted to a professional.
Did our article help solve your problem? Perhaps you have encountered other stove malfunctions or repair methods? Write your stories and questions in comments. Call us at ️(800) 657-0765