- Home
- /
- Company’s Blog
- /
- Blog
- /
- My Thermador Oven is Not...
My Thermador Oven is Not Heating
You bought a Thermador oven because you know quality, and expect reliability. We need reliability in our kitchens and in our kitchen appliances if we’re going to get things done in this busy world. But even a Thermador brand appliance can break down from time to time. If you find that your Gas oven is not heating, there are several ways to troubleshoot, diagnose, and fix the problem. With a little patience and handy work, you can fix your oven and get it back to heating again. Read the steps in this guide to find out how or call us at ️(800)657-0765.
Before Getting Started
Remember a few safety tips before getting started: always unplug the appliance before servicing the inside cabinet, always wait until the appliance is cool to service it, wear protective eyewear and clothing when necessary, and don’t be afraid to call in a Thermador oven repair professional when needed.
Step 1: Bake Element
A first step to take is to inspect the Thermador’s bake element. When the element is operating properly, it should glow red hot. If the element is not glowing red when you turn the oven on, it is a clear indication that the element is not heating. Elements are usually visually damaged when they burn out: look for darker places on the element, holes, or blisters. If you want to go a step further, use a multimeter to test the element for current. If the element is bad, it will have to be replaced.
Step 2: Broil Element
Second, inspect the Thermador’s broil element. Look for the same signs of damage as above: holes, blisters, or dark spots. Check that the broil element is glowing hot when you activate it on the oven. If it’s not glowing during operation, then the element is not heating. If you have a multimeter, you can check for continuity in the element. If, from any of these inspections, you feel the element has failed, it will need to be replaced according to the owner’s manual specifications.
Step 3: Incoming Power Problem
A third troubleshooting step is to check for incoming power levels. Electric ovens require more power than standard appliances, drawing 240 volts. Gas ovens require 120 volts. It is possible, especially in older homes, that the dedicated outlet for the oven is not providing the proper voltage. The only way to test this problem is by using a multimeter or similar device to check the voltage level at the outlet. Only perform this check if you feel comfortable working with these tools in this situation. If you don’t have the proper current at the outlet, you’ll need to troubleshoot your home’s electrical system to find out why or call us at ️(800)657-0765.
Step 4: Thermal Fuse
Fourth, check your Thermador’s thermal fuse. All modern ovens are equipped with thermal fuses, which stop oven operations if the appliance reaches too great a temperature this is an excellent safety feature, but if something causes the thermal fuse to blow, the oven will not heat up properly. A fuse usually blows only in extreme circumstances, so it’s not the most likely cause of your oven’s lack of heat (which is why we check it fourth). Find your thermal fuse using the Thermador owner’s manual, and inspect it for signs of being blown. A multimeter will be the best way to know for sure. If the fuse has been blown, it has to be replaced with an identical fuse.
Step 5: Bad Wire Connection
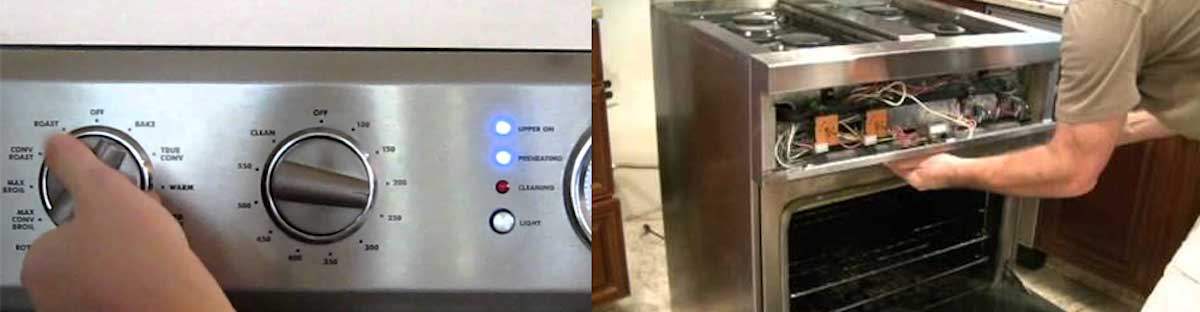
The fifth troubleshooting step for a Thermador oven that won’t heat up is to check the wiring of the oven. You should inspect the wires that lead to the elements on your oven, as well the wires that connect with the igniter component. If this requires you to open the cabinet of the oven, you may also want to inspect other connections and wires where you can. Look for signs of burned out wires, arced wires, or places where the oven may have leaked hot fluids or grease onto electrical components. It can be difficult and complicated to replace wires, so it may be time to call in a professional if you’re not comfortable with the layout of the oven’s wiring.
Step 6: Oven Control Board
A final component to inspect is the oven control board. The oven control board is the “brains” of the operation, sending proper voltage to the bake and broil circuits depending on how you set the oven. If the control board is failing, it won’t send the right voltage to the other components in the appliance. Oven control boards are not likely to fail, but it is possible. Be sure to go through all other diagnostic steps above before turning to the board. If everything else seems to be working properly, it may be time to replace your control board. It takes a professional to test an oven control board, so either call in a pro or head to the parts shop.
Step 7: Igniter fault
If you turn the knob, hear the characteristic hiss, press the button and the gas does not light up – it means that the problem with electric ignition of the gas stove Hephaestus, and you can try to fix it yourself.
If you hear characteristic clicks, it means that the system is triggered somewhere, there is no spark only on the burner used. If there are no clicks, it means that the button or block generator of electrical impulses is broken.
Step 8: Temperature sensor wont work properly
The hob or oven lights up as usual by turning and pressing the knob, but goes out as soon as you release the knob. The gas control system automatically shuts off the gas if the burner is out or if the knob is turned but not pressed – to protect against children.
Usually it is enough to keep the knob pressed for 3 – 5 seconds, the manufacturer recommends 10 – 60 seconds for sure. If the burner knob goes out even after one minute, the leak protection system is faulty.
The gas control must only be installed in the oven or on all burners. The head of the thermocouple is located near the burner, it is metallic and rather thin, warming up quickly from the burning gas. The heat from it is transferred via a copper tube to the gas sensor installed in the tap behind the burner handle. As soon as the heat stops flowing, the magnetic valve of the sensor opens to cut off the gas supply.